
 Pin
Pin
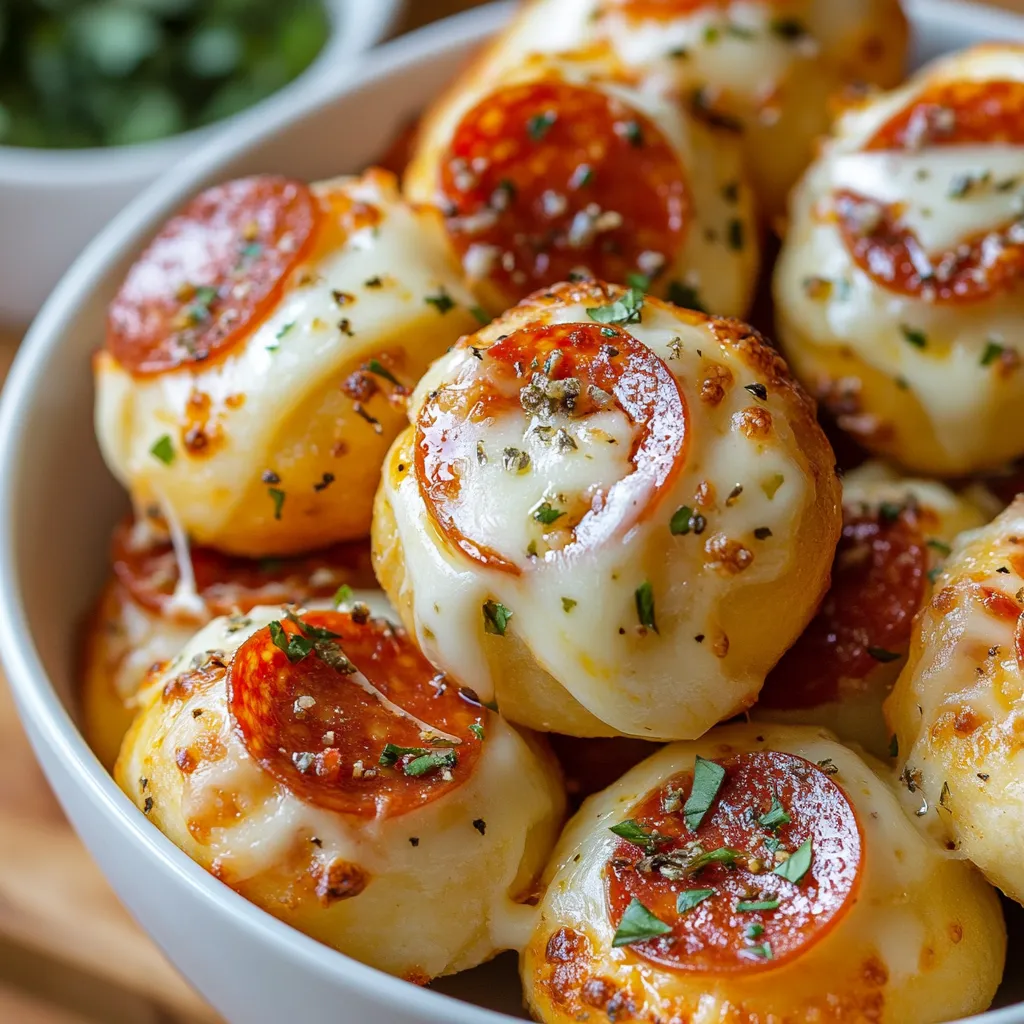
My kitchen fills with the smell of sizzling garlic and gooey cheese as I pull out golden dough puffs from the oven, each one hiding a treasure of melted goodness inside. I've tried countless party snacks over the years, but these pizza bombs have become my go-to crowd favorite. The magic isn't just in how good they taste, but in watching friends' faces light up when they bite into that stretchy cheese center. There's something so satisfying about the combo of the buttery, garlic-coated outside and the tasty filling inside that makes these vanish from plates just minutes after they're served.
I whipped up these pizza bombs for the first time when I needed a quick dish for our block party that wouldn't turn off picky eaters. They were gone in a flash, and I've been tweaking the recipe ever since. Now my kids ask for them whenever we have movie night, and they're the number one thing friends want me to bring to gatherings.
Key Ingredients
- Refrigerated Biscuit Dough: Makes the fluffy, soft outer shell
- Fresh Mozzarella: Gives you that amazing stretchy cheese pull
- Quality Marinara: Sets the base for that true pizza taste
- Pepperoni: Adds that rich meaty flavor and depth
- Garlic Butter Topping: Takes these bombs to the next level with amazing smell
- Fresh Parmesan: Makes a tasty, crunchy outside layer
Crafting Your Pizza Bombs
- Set Up Your Kitchen:
- Heat your oven to 375°F for the best rise and color. Put parchment on your baking tray for no mess cleanup. Get everything out before you start so assembly goes smoothly. Keep some extra flour nearby in case your dough gets sticky.
- Make Your Dough Pockets:
- Pull apart each biscuit and cut through the middle for thinner pieces. Press them out with your fingers to make 3-inch circles. Put a small amount of filling right in the middle. Pinch the edges firmly to make sure they're fully closed.
- Add Extra Flavor:
- Mix melted butter with chopped garlic and herbs. Brush it all over your sealed dough balls. Sprinkle fresh grated Parmesan on top. You can also add a bit of Italian seasoning if you want.
- Nail the Cooking Process:
- Leave space between each bomb on the tray. Bake until they're golden and puffy. A tiny bit of leakage means they're done. Let them cool a little before eating.
 Pin
Pin
Helpful Kitchen Tools
You don't need fancy gear to make awesome pizza bombs, so even beginner cooks can handle this recipe.
- Baking Sheet: A big one with sides will catch any cheese that might leak out
- Parchment Paper: Keeps your bombs from sticking and makes cleanup super easy
- Small Bowls: Helps keep your toppings organized for faster assembly
- Pastry Brush: Lets you spread the garlic butter evenly on top
A good sharp knife works better than trying to tear the biscuits by hand. I've found that using a small ice cream scoop (about 1 tablespoon size) gives you just the right amount of filling that won't overflow during cooking. You don't absolutely need one, but a food thermometer can be handy to check if bigger batches are fully cooked inside, which matters when bombs aren't all the same size.
Custom Flavor Ideas
What makes pizza bombs so great is how easy they are to customize - they're basically a blank slate for whatever flavors you love.
If you like classic pizza flavors, try:
- The basic pepperoni and mozzarella combo
- Italian sausage mixed with colorful peppers
- Mushrooms and olives for a meat-free option
For more exciting taste combos:
- Buffalo chicken chunks with blue cheese crumbles
- Spinach and feta with a tiny sprinkle of nutmeg
- Morning bombs filled with eggs and bacon bits
My family really loves our 'loaded' version with small chunks of pepperoni, peppers, and onions all mixed in together. When you're having friends over, try making different flavors and marking them with various herbs on top so people can pick their favorites. You can try almost anything - just remember to keep wet ingredients to a minimum and cook any raw meat or veggies beforehand so everything finishes cooking properly.
Keeping Leftovers Fresh
Put cooled pizza bombs in a sealed container in the fridge where they'll last up to three days. Don't warm them in the microwave or they'll get chewy and tough. Instead, pop them in a 350°F oven for 5-7 minutes until they're hot again. To freeze them, let them cool first, then place them on a baking sheet until they're solid, and move them to freezer bags where they'll stay good for up to two months. When you want to eat frozen bombs, just add 5-7 more minutes to your original baking time. Put paper towels in your storage containers to soak up extra moisture and keep them from getting soggy.
Great Serving Combos
These tasty bombs work for so many occasions, from regular weeknight meals to special parties. Serve them with a fresh green salad and Italian dressing to balance out their richness. When it's cold outside, pair them with some tomato soup and use the bombs for dipping. For parties, put them on a big plate with different dipping sauces - try pesto, ranch, or garlic mayo along with the usual marinara. They're great starters before a pasta dinner or alongside meat and cheese platters for Italian-themed parties. On game days, set them out with other finger foods like chicken wings and veggie trays.
Fixing Common Problems
If your bombs leak while baking, you probably put in too much filling or didn't pinch the edges well enough. When your dough won't stick together, wet your fingers with a bit of water to help seal it better. If the bottoms get too brown too fast, move your tray higher in the oven and loosely cover with foil. When the cheese isn't melting right, you've likely cut pieces that are too big - try smaller chunks next time. For bombs that look done outside but are still doughy inside, turn your oven down by 25 degrees and cook them 5 minutes longer. This gives the inside time to cook without burning the outside.
 Pin
Pin
Final Thoughts
Pizza bombs hit that sweet spot between easy cooking and amazing results. They turn basic ingredients into something that feels special enough for company but simple enough for everyday meals. There's something magical about watching someone's face light up when they discover that melty cheese center - it creates a shared moment that makes these more than just a snack. Whether you're trying to please fussy kids, entertain guests, or just want a fun cooking project with delicious results, these versatile little packages deliver big satisfaction in every bite. Next time you need a crowd-pleasing dish that comes together quickly but tastes like you spent hours, remember these golden pockets of joy are just a few simple steps away.
Recipe Questions & Answers
- → Can I prep these bites earlier?
- Yes, chill them raw for a few hours before baking. Add 2–3 more minutes if baking straight from the fridge.
- → What’s a vegetarian alternative to pepperoni?
- Try using chopped veggies like bell peppers, mushrooms, or spinach, but keep them as dry as possible first.
- → Why’s my cheese escaping when baking?
- Ensure the dough is tightly sealed with no gaps or thin areas. Using small cheese pieces can help too.
- → Can I freeze these cheesy bites?
- Absolutely! Freeze them uncooked, then bake straight from frozen, adding 5–7 minutes extra to the time.
- → What's the best way to warm up leftover bites?
- Heat them in the oven at 350°F for about 5–7 minutes. Skip the microwave—it makes the dough soggy.